介绍 Java 注解、元注解及反射机制,并通过拦截器与 AOP 示例说明登录校验和日志打印。
关键词#
Java、注解、反射、Spring、AOP
Java 自定义注解通常结合 拦截器 或
AOP 使用。通过自定义注解设计框架,可以让代码更简洁。
什么是注解?#
Java 注解机制从 JDK 5.0 开始引入。
可以为类、方法、变量、参数和包等语言元素添加注解。
与 Javadoc 不同,注解的内容可以通过反射获取。
编译器生成 class 文件时,可以将注解嵌入字节码。
Java 虚拟机可以保留注解内容,并在运行时读取。
Java 也支持自定义注解。
Java 定义了一组基础注解。
这里介绍其中 7 种:3 种位于 Java Lang,另外 4 种称为元注解,位于 java.lang.annotation。
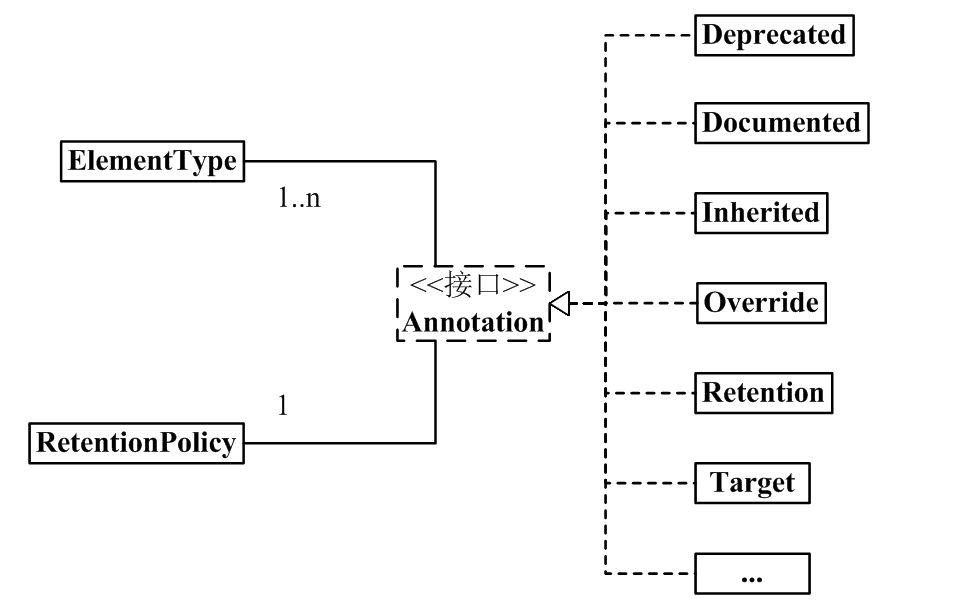 作用于代码的注解包括:
@Override
检查方法是否重写了父类或接口中的方法。
如果父类或对应接口没有该方法,编译器会报错。@Deprecated
标记过时的方法。使用这些方法时,编译器会给出警告。@Suppresswarnings
指示编译器忽略注解中指定的警告。
作用于其他注解的元注解包括:
@Retention
指定注解的保留方式:仅保留在源码、写入 class 文件,或允许在运行时通过反射访问。@Documented
指定该注解是否包含在用户文档中。@Target
指定注解可以作用于哪些 Java 元素。@Inherited
指定类级别的注解是否可以被子类继承;默认情况下,子类不会继承父类的注解。
常用元注解#
较常用的元注解有两种:
1
2
3
4
5
6
| @Target(ElementType.FIELD)
@Retention(RetentionPolicy.RUNTIME)
public @interface MyField {
String description();
int length();
}
|
注解使用示例#
1. 通过反射获取注解#
继续使用上面的自定义注解 @MyField,通过反射读取注解内容。
 1
 2
 3
 4
 5
 6
 7
 8
 9
10
11
12
13
14
15
16
17
18
| public class MyFieldTest {
// user the custion annotataion
@MyField(description = "username", length = 12)
private String username;
@Test
public void testMyField(){
// get the class Template
Class c = MyFieldTest.class;
// get all fields
for(Field f : c.getDeclaredFields()){
// Determine if this field has the MyField annotation
if(f.isAnnotationPresent(MyField.class)){
MyField annotation = f.getAnnotation(MyField.class);
System.out.println("field:[" + f.getName() + "], description:[" + annotation.description() + "], length:[" + annotation.length() +"]");
}
}
}
}
|
2. 注解与拦截器:登录校验#
接下来使用 Spring Boot 拦截器实现登录校验。
如果方法添加了 @LoginRequired,则提示对应接口需要登录后才能访问;
否则不要求登录。
首先定义 LoginRequired 注解。
1
2
3
| @Target(ElementType.METHOD)
@Retention(RetentionPolicy.RUNTIME)
public @interface LoginRequired {}
|
然后编写两个简单接口,分别访问 sourceA、sourceB 资源。
 1
 2
 3
 4
 5
 6
 7
 8
 9
10
11
12
13
| @RestController
public class IndexController {
@GetMapping("/sourceA")
public String sourceA(){
return "you are visiting sourceA";
}
@LoginRequired
@GetMapping("/sourceB")
public String sourceB(){
return "you are visiting sourceB";
}
}
|
实现 Spring 的 HandlerInterceptor 接口,编写登录认证拦截器。
 1
 2
 3
 4
 5
 6
 7
 8
 9
10
11
12
13
14
15
16
17
18
19
20
21
22
| public class SourceAccessInterceptor implements HandlerInterceptor {
@Override
public boolean preHandle(HttpServletRequest request, HttpServletResponse response, Object handler) throws Exception {
System.out.println("entering the interceptor");
// get the annotation through reflection
HandlerMethod handlerMethod = (HandlerMethod)handler;
LoginRequired loginRequired = handlerMethod.getMethod().getAnnotation(LoginRequired.class);
if(loginRequired == null){
return true;
}
// Prompt user to log in
response.setContentType("application/json; charset=utf-8");
response.getWriter().print("the source you are visiting needs logined");
return false;
}
@Override
public void postHandle(HttpServletRequest request, HttpServletResponse response, Object handler, ModelAndView modelAndView) throws Exception {}
@Override
public void afterCompletion(HttpServletRequest request, HttpServletResponse response, Object handler, Exception ex) throws Exception {}
}
|
3. 注解与 AOP:日志打印#
首先引入切面需要的依赖。
1
2
3
4
| <dependency>
<groupId>org.springframework.boot</groupId>
<artifactId>spring-boot-starter-aop</artifactId>
</dependency>
|
然后定义注解 @MyLog。
1
2
3
| @Target(ElementType.METHOD)
@Retention(RetentionPolicy.RUNTIME)
public @interface MyLog {}
|
定义日志切面类。
 1
 2
 3
 4
 5
 6
 7
 8
 9
10
11
12
13
14
15
16
17
18
19
20
21
22
23
24
25
26
27
28
29
30
| // Indicates that this is an aspect class
@Aspect
@Component
public class MyLogAspect {
// PointCut indicates that this is a pointcut, and @annotation indicates
// that this pointcut cuts to an annotation
@Pointcut("@annotation(me.zebin.demo.annotationdemo.aoplog.MyLog)")
public void logPointCut(){};
// around notify
@Around("logPointCut()")
public void logAround(ProceedingJoinPoint joinPoint){
// access methodName
String methodName = joinPoint.getSignature().getName();
// access param
Object[] param = joinPoint.getArgs();
StringBuilder sb = new StringBuilder();
for(Object o : param){
sb.append(o + "; ");
}
System.out.println("enter [" + methodName + "] method, parameters are:" + sb.toString());
// continue proceed method
try {
joinPoint.proceed();
} catch (Throwable throwable) {
throwable.printStackTrace();
}
System.out.println(methodName + "method done");
}
}
|
在第二个示例的 IndexController 中添加 sourceC 测试接口,并加上自定义注解:
1
2
3
4
5
| @MyLog
@GetMapping("/sourceC/{source_name}")
public String sourceC(@PathVariable("source_name") String sourceName){
return "you are visiting sourceC";
}
|